مقدمة
مرحباً بالجميع! في هذا المقال، سنتناول موضوعاً محورياً في علوم الحاسوب وتطوير البرمجيات: هياكل البيانات (Data Structures). إنه بلا شك موضوع لا غنى عنه لأي شخص يعمل في عالم تطوير البرمجيات، ولكنه قد يبدو صعب الفهم وحتى مخيفاً بعض الشيء عند البداية. في هذا المقال، سأحاول تقديم شرح مبسط لهياكل البيانات، ماهيتها، متى تكون مفيدة، وكيف يمكننا تطبيقها باستخدام JavaScript. لنبدأ!
جدول المحتويات
- ما هي هيكلة البيانات؟
- Arrays
- Objects (hash tables)
- Stacks
- Queues
- Linked lists
- Singly linked lists
- Doubly linked lists
- Trees
- Binary trees
- Heaps
- Graphs
- Undirected and directed graphs
- Weighted and unweighted graphs
- كيفية تمثيل Graphs
- خلاصة
ما هي هيكلة البيانات؟
في علوم الحاسوب، هيكلة البيانات هي تنسيق لتنظيم وإدارة وتخزين البيانات بطريقة تسمح بالوصول والتعديل الفعال. وبشكل أكثر دقة، هيكلة البيانات هي مجموعة من قيم البيانات، والعلاقات بينها، والوظائف أو العمليات التي يمكن تطبيقها على تلك البيانات.
قد تبدو هذه التعريفات مجردة بعض الشيء في البداية، ولكن فكر في الأمر. إذا كنت تكتب الأكواد منذ فترة قصيرة، فلا بد أنك استخدمت هياكل البيانات من قبل. هل استخدمت Arrays و Objects؟ هذه كلها هياكل بيانات. جميعها عبارة عن مجموعة من القيم التي ترتبط ببعضها البعض، ويمكنك إجراء عمليات عليها.
// A collection of the values 1, 2 and 3
const arr = [1, 2, 3]

// Each value is related to one another, in the sense that each is indexed in a position of the array
const indexOfTwo = arr.indexOf(2)
console.log(arr[indexOfTwo - 1]) // 1
console.log(arr[indexOfTwo + 1]) // 3

// We can perform many operations on the array, like pushing new values into it
arr.push(4)
console.log(arr) // [1,2,3,4]
تحتوي JavaScript على هياكل بيانات بدائية (built-in) وغير بدائية (non-primitive). تأتي هياكل البيانات البدائية بشكل افتراضي مع لغة البرمجة ويمكنك تطبيقها مباشرة (مثل Arrays و Objects). أما هياكل البيانات غير البدائية فلا تأتي بشكل افتراضي وعليك كتابة الكود الخاص بها إذا أردت استخدامها.
توجد هياكل بيانات مختلفة لأن بعضها أنسب لأنواع معينة من العمليات. من المحتمل أن تتمكن من معالجة معظم مهام البرمجة باستخدام هياكل البيانات المدمجة، ولكن لبعض المهام المحددة جداً، قد تكون هيكلة البيانات غير البدائية مفيدة.
الآن دعنا ننتقل إلى هياكل البيانات الأكثر شيوعاً، ونرى كيف يعمل كل منها، وفي أي المناسبات تكون مفيدة، وكيف يمكننا كتابة الكود الخاص بها في JavaScript.
Arrays
الـ Array هي مجموعة من العناصر المخزنة في مواقع ذاكرة متجاورة. يمكن الوصول إلى كل عنصر من خلال رقم فهرسه (موقعه). تبدأ الـ Arrays دائماً من الفهرس 0، لذا في Array مكونة من 4 عناصر، يمكننا الوصول إلى العنصر الثالث باستخدام رقم الفهرس 2.
const arr = ['a', 'b', 'c', 'd']
console.log(arr[2]) // c
خاصية الـ length للـ Array تُعرف بعدد العناصر التي تحتويها. إذا كانت الـ Array تحتوي على 4 عناصر، يمكننا القول إن الـ Array لها طول 4.
const arr = ['a', 'b', 'c', 'd']
console.log(arr.length) // 4
في بعض لغات البرمجة، يمكن للمستخدم تخزين قيم من نفس النوع فقط في Array واحدة، ويجب تحديد طول الـ Array لحظة إنشائها ولا يمكن تعديله لاحقاً. في JavaScript، الأمر ليس كذلك، حيث يمكننا تخزين قيم من أي نوع في نفس الـ Array، ويمكن أن يكون طولها ديناميكياً (يمكن أن ينمو أو يتقلص حسب الحاجة).
const arr = ['store', 1, 'whatever', 2, 'you want', 3]يمكن تخزين أي نوع بيانات في Array، وهذا يشمل الـ Arrays أيضاً. الـ Array التي تحتوي على Arrays أخرى بداخلها تسمى Array متعددة الأبعاد (multidimensional array).
const arr = [
  [1, 2, 3],
  [4, 5, 6],
  [7, 8, 9],
]
في JavaScript، تأتي الـ Arrays مع العديد من الخصائص والـ methods المدمجة التي يمكننا استخدامها لأغراض مختلفة، مثل إضافة أو حذف عناصر من الـ Array، فرزها، تصفية قيمها، معرفة طولها، وهكذا. يمكنك العثور على قائمة كاملة بـ methods الـ Array هنا.
كما ذكرت، في الـ Arrays، لكل عنصر فهرس محدد بموقعه في الـ Array. عندما نضيف عنصراً جديداً في نهاية الـ Array، فإنه يأخذ فقط رقم الفهرس الذي يلي العنصر الأخير السابق في الـ Array. ولكن عندما نضيف/نحذف عنصراً جديداً في بداية أو منتصف الـ Array، يجب تغيير فهارس جميع العناصر التي تأتي بعد العنصر المضاف/المحذوف. هذا بالطبع له تكلفة حسابية، وهو أحد نقاط ضعف هيكلة البيانات هذه.
تكون الـ Arrays مفيدة عندما نحتاج إلى تخزين قيم فردية وإضافة/حذف قيم من نهاية هيكلة البيانات. ولكن عندما نحتاج إلى الإضافة/الحذف من أي جزء منها، توجد هياكل بيانات أخرى تعمل بكفاءة أكبر (سنتحدث عنها لاحقاً).
Objects (hash tables)
في JavaScript، الـ Object هو مجموعة من أزواج المفتاح-القيمة (key-value pairs). تُسمى هيكلة البيانات هذه أيضاً map أو dictionary أو hash-table في لغات البرمجة الأخرى. يبدو الـ Object النموذجي في JS هكذا:
const obj = {
  prop1: "I'm",
  prop2: "an",
  prop3: "object"
}
نستخدم الأقواس المتعرجة {} للإعلان عن الـ Object. ثم نعلن عن كل مفتاح متبوعاً بنقطتين، والقيمة المقابلة. من المهم الإشارة إلى أن كل مفتاح يجب أن يكون فريداً داخل الـ Object. لا يمكنك أن يكون لديك مفتاحان بنفس الاسم.
يمكن للـ Objects تخزين كل من القيم والوظائف. عند الحديث عن الـ Objects، تسمى القيم properties، وتسمى الوظائف methods.
const obj = {
  prop1: "Hello!",
  prop3: function () {
    console.log("I'm a property dude!")
  }
}
للوصول إلى الـ properties، يمكنك استخدام صيغتين مختلفتين، إما object.property أو object["property"]. للوصول إلى الـ methods، نستدعي object.method().
console.log(obj.prop1) // "Hello!"
console.log(obj["prop1"]) // "Hello!"
obj.prop3() // "I'm a property dude!"
صيغة تعيين قيم جديدة مشابهة تماماً:
obj.prop4 = 125
obj["prop5"] = "The new prop on the block"
obj.prop6 = () => console.log("yet another example")

console.log(obj.prop4) // 125
console.log(obj["prop5"]) // "The new prop on the block"
obj.prop6() // "yet another example"
مثل الـ Arrays، تأتي الـ Objects في JavaScript مع العديد من الـ methods المدمجة التي تسمح لنا بإجراء عمليات مختلفة والحصول على معلومات من Object معين. يمكن العثور على قائمة كاملة هنا.
تعد الـ Objects طريقة جيدة لتجميع البيانات التي تشترك في شيء ما أو ترتبط بطريقة ما. أيضاً، بفضل حقيقة أن أسماء الـ properties فريدة، تكون الـ Objects مفيدة عندما يتعين علينا فصل البيانات بناءً على شرط فريد. مثال على ذلك يمكن أن يكون عد عدد الأشخاص الذين يحبون أطعمة مختلفة:
const obj = {
  pizzaLovers: 1000,
  pastaLovers: 750,
  argentinianAsadoLovers: 12312312312313123
}
Stacks
الـ Stacks هي هياكل بيانات تخزن المعلومات على شكل قائمة. تسمح فقط بإضافة وإزالة العناصر وفق نمط LIFO (last in, first out) – أي آخر ما يدخل هو أول ما يخرج. في الـ Stacks، لا يمكن إضافة أو إزالة العناصر خارج الترتيب، بل يجب أن تتبع دائماً نمط LIFO.
لفهم كيفية عمل ذلك، تخيل كومة من الأوراق فوق مكتبك. يمكنك فقط إضافة المزيد من الأوراق إلى الكومة بوضعها فوق جميع الأوراق الأخرى. ويمكنك إزالة ورقة من الكومة فقط بأخذ الورقة الموجودة في الأعلى. آخر ما يدخل، أول ما يخرج. LIFO.

كومة من الأوراق
تكون الـ Stacks مفيدة عندما نحتاج إلى التأكد من أن العناصر تتبع نمط LIFO. بعض الأمثلة على استخدام الـ Stack هي:
- الـ Call Stack في JavaScript.
- إدارة استدعاءات الوظائف في لغات البرمجة المختلفة.
- وظيفة التراجع/الإعادة (undo/redo) التي تقدمها العديد من البرامج.
هناك أكثر من طريقة لتطبيق الـ Stack، ولكن ربما أبسطها هو استخدام Array مع الـ methods push و pop. إذا استخدمنا pop و push فقط لإضافة وحذف العناصر، فسنتبع دائماً نمط LIFO وبالتالي نعمل عليها كـ Stack. طريقة أخرى هي تطبيقها كقائمة، والتي قد تبدو هكذا:
// We create a class for each node within the stack
class Node {
  // Each node has two properties, its value and a pointer that indicates the node that follows
  constructor(value) {
    this.value = value
    this.next = null
  }
}

// We create a class for the stack
class Stack {
  // The stack has three properties, the first node, the last node and the stack size
  constructor() {
    this.first = null
    this.last = null
    this.size = 0
  }

  // The push method receives a value and adds it to the "top" of the stack
  push(val) {
    var newNode = new Node(val)
    if (!this.first) {
      this.first = newNode
      this.last = newNode
    } else {
      var temp = this.first
      this.first = newNode
      this.first.next = temp
    }
    return ++this.size
  }

  // The pop method eliminates the element at the "top" of the stack and returns its value
  pop() {
    if (!this.first) return null
    var temp = this.first
    if (this.first === this.last) {
      this.last = null
    }
    this.first = this.first.next
    this.size--
    return temp.value
  }
}

const stck = new Stack
stck.push("value1")
stck.push("value2")
stck.push("value3")
console.log(stck.first)
/* Node { value: 'value3', next: Node { value: 'value2', next: Node { value: 'value1', next: null } } } */
console.log(stck.last) // Node { value: 'value1', next: null }
console.log(stck.size) // 3
stck.push("value4")
console.log(stck.pop()) // value4
تعقيد Big O لـ methods الـ Stack هو كالتالي:
- Insertion - O(1)
- Removal - O(1)
- Searching - O(n)
- Access - O(n)
Queues
تعمل الـ Queues بطريقة مشابهة جداً للـ Stacks، ولكن العناصر تتبع نمطاً مختلفاً للإضافة والإزالة. تسمح الـ Queues فقط بنمط FIFO (first in, first out) – أي أول ما يدخل هو أول ما يخرج. في الـ Queues، لا يمكن إضافة أو إزالة العناصر خارج الترتيب، بل يجب أن تتبع دائماً نمط FIFO.
لفهم هذا، تخيل أشخاصاً يصطفون في طابور لشراء الطعام. المنطق هنا هو أنه إذا وصلت إلى الطابور أولاً، فستكون أول من يتم خدمته. إذا وصلت أولاً، فستكون أول من يخرج. FIFO.

طابور من العملاء
بعض الأمثلة على استخدام الـ Queue هي:
- المهام الخلفية (Background tasks).
- معالجة الطباعة/المهام (Printing/task processing).
كما هو الحال مع الـ Stacks، هناك أكثر من طريقة لتطبيق الـ Queue. ولكن ربما أبسطها هو استخدام Array مع الـ methods push و shift. إذا استخدمنا push و shift فقط لإضافة وحذف العناصر، فسنتبع دائماً نمط FIFO وبالتالي نعمل عليها كـ Queue. طريقة أخرى هي تطبيقها كقائمة، والتي قد تبدو هكذا:
// We create a class for each node within the queue
class Node {
  // Each node has two properties, its value and a pointer that indicates the node that follows
  constructor(value) {
    this.value = value
    this.next = null
  }
}

// We create a class for the queue
class Queue {
  // The queue has three properties, the first node, the last node and the queue size
  constructor() {
    this.first = null
    this.last = null
    this.size = 0
  }

  // The enqueue method receives a value and adds it to the "end" of the queue
  enqueue(val) {
    var newNode = new Node(val)
    if (!this.first) {
      this.first = newNode
      this.last = newNode
    } else {
      this.last.next = newNode
      this.last = newNode
    }
    return ++this.size
  }

  // The dequeue method eliminates the element at the "beginning" of the queue and returns its value
  dequeue() {
    if (!this.first) return null
    var temp = this.first
    if (this.first === this.last) {
      this.last = null
    }
    this.first = this.first.next
    this.size--
    return temp.value
  }
}

const quickQueue = new Queue
quickQueue.enqueue("value1")
quickQueue.enqueue("value2")
quickQueue.enqueue("value3")
console.log(quickQueue.first)
/* Node { value: 'value1', next: Node { value: 'value2', next: Node { value: 'value3', next: null } } } */
console.log(quickQueue.last) // Node { value: 'value3, next: null }
console.log(quickQueue.size) // 3
quickQueue.enqueue("value4")
console.log(quickQueue.dequeue()) // value1
تعقيد Big O لـ methods الـ Queue هو كالتالي:
- Insertion - O(1)
- Removal - O(1)
- Searching - O(n)
- Access - O(n)
Linked lists
الـ Linked lists هي نوع من هياكل البيانات التي تخزن القيم على شكل قائمة. داخل القائمة، يعتبر كل قيمة node، وكل node متصلة بالقيمة التالية في القائمة (أو null في حال كان العنصر هو الأخير في القائمة) من خلال pointer.
هناك نوعان من الـ Linked lists: الـ singly linked lists والـ doubly linked lists. كلاهما يعملان بشكل مشابه جداً، ولكن الفرق هو أن في الـ singly linked lists، كل node لديها pointer واحد يشير إلى الـ node التالية في القائمة. بينما في الـ doubly linked lists، كل node لديها two pointers، أحدهما يشير إلى الـ node التالية والآخر يشير إلى الـ node السابقة.
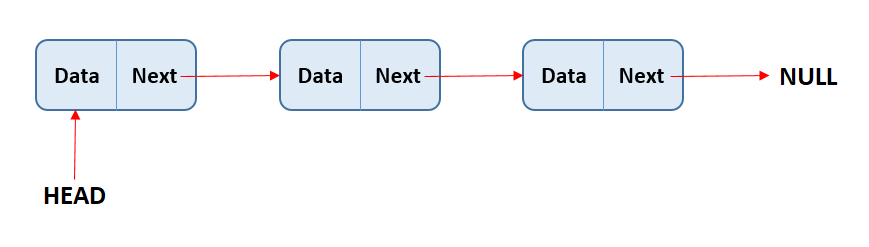
في الـ singly linked list، كل node لديها pointer واحد
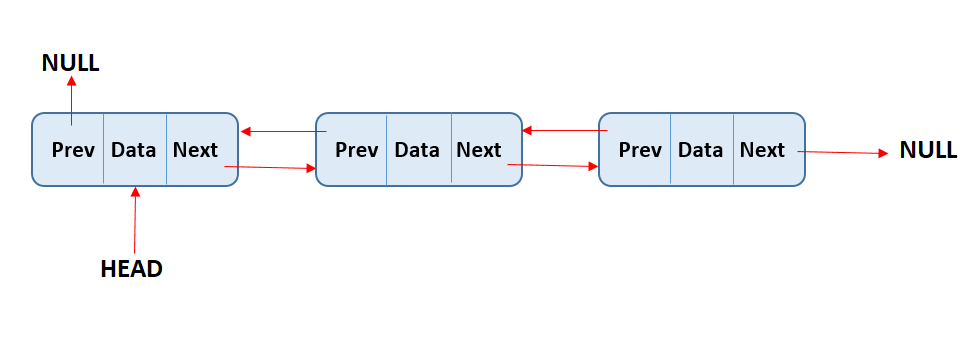
في الـ doubly linked list، كل node لديها two pointers
يعتبر العنصر الأول في القائمة هو الـ head، والعنصر الأخير هو الـ tail. مثل الـ Arrays، تُعرف خاصية الـ length بعدد العناصر التي تحتويها القائمة.
الاختلافات الرئيسية مقارنة بالـ Arrays هي كالتالي:
- الـ Lists ليس لديها فهارس (indexes). كل قيمة "تعرف" فقط القيم التي تتصل بها من خلال الـ pointers.
- بما أن الـ Lists ليس لديها فهارس، لا يمكننا الوصول إلى القيم بشكل عشوائي. عندما نريد الوصول إلى قيمة، يجب علينا دائماً البحث عنها عن طريق التكرار عبر القائمة بدءاً من الـ
headأو الـtail. - الجانب الإيجابي لعدم وجود فهارس هو أن الإضافة/الحذف في أي جزء من القائمة أكثر كفاءة من الـ Arrays. نحتاج فقط إلى إعادة توجيه الـ pointers للقيم "المجاورة"، بينما في الـ Arrays، تحتاج القيم إلى إعادة فهرسة.
مثل أي هيكلة بيانات، يتم تطبيق طرق مختلفة للعمل على البيانات. تشمل الطرق الأكثر شيوعاً: push، pop، unshift، shift، get، set، insert، remove، و reverse.
دعنا أولاً نرى كيفية تطبيق الـ singly linked list ثم الـ doubly linked list.
Singly linked list
يمكن أن يبدو تطبيق كامل لـ singly linked list هكذا:
// We create a class for each node within the list
class Node {
  // Each node has two properties, its value and a pointer that indicates the node that follows
  constructor(val) {
    this.val = val
    this.next = null
  }
}

// We create a class for the list
class SinglyLinkedList {
  // The list has three properties, the head, the tail and the list size
  constructor() {
    this.head = null
    this.tail = null
    this.length = 0
  }

  // The push method takes a value as parameter and assigns it as the tail of the list
  push(val) {
    const newNode = new Node(val)
    if (!this.head) {
      this.head = newNode
      this.tail = this.head
    } else {
      this.tail.next = newNode
      this.tail = newNode
    }
    this.length++
    return this
  }

  // The pop method removes the tail of the list
  pop() {
    if (!this.head) return undefined
    let current = this.head
    let newTail = current
    while (current.next) {
      newTail = current
      current = current.next
    }
    this.tail = newTail
    this.tail.next = null
    this.length--
    if (this.length === 0) {
      this.head = null
      this.tail = null
    }
    return current
  }

  // The shift method removes the head of the list
  shift() {
    if (!this.head) return undefined
    var currentHead = this.head
    this.head = currentHead.next
    this.length--
    if (this.length === 0) {
      this.tail = null
    }
    return currentHead
  }

  // The unshift method takes a value as parameter and assigns it as the head of the list
  unshift(val) {
    const newNode = new Node(val)
    if (!this.head) {
      this.head = newNode
      this.tail = this.head
    }
    newNode.next = this.head
    this.head = newNode
    this.length++
    return this
  }

  // The get method takes an index number as parameter and returns the value of the node at that index
  get(index) {
    if (index < 0 || index >= this.length) return null
    let counter = 0
    let current = this.head
    while (counter !== index) {
      current = current.next
      counter++
    }
    return current
  }

  // The set method takes an index number and a value as parameters, and modifies the node value at the given index in the list
  set(index, val) {
    const foundNode = this.get(index)
    if (foundNode) {
      foundNode.val = val
      return true
    }
    return false
  }

  // The insert method takes an index number and a value as parameters, and inserts the value at the given index in the list
  insert(index, val) {
    if (index < 0 || index > this.length) return false
    if (index === this.length) return !!this.push(val)
    if (index === 0) return !!this.unshift(val)

    const newNode = new Node(val)
    const prev = this.get(index - 1)
    const temp = prev.next
    prev.next = newNode
    newNode.next = temp
    this.length++
    return true
  }

  // The remove method takes an index number as parameter and removes the node at the given index in the list
  remove(index) {
    if (index < 0 || index >= this.length) return undefined
    if (index === 0) return this.shift()
    if (index === this.length - 1) return this.pop()

    const previousNode = this.get(index - 1)
    const removed = previousNode.next
    previousNode.next = removed.next
    this.length--
    return removed
  }

  // The reverse method reverses the list and all pointers so that the head becomes the tail and the tail becomes the head
  reverse() {
    let node = this.head
    this.head = this.tail
    this.tail = node
    let next
    let prev = null
    for (let i = 0; i < this.length; i++) {
      next = node.next
      node.next = prev
      prev = node
      node = next
    }
    return this
  }
}
تتمتع methods الـ Singly linked lists بالتعقيدات التالية:
- Insertion - O(1)
- Removal - O(n)
- Search - O(n)
- Access - O(n)
Doubly linked lists
كما ذكرنا، الفرق بين الـ doubly والـ singly linked lists هو أن الـ doubly linked lists تربط nodesها من خلال pointers مع كل من القيمة السابقة والتالية. من ناحية أخرى، الـ singly linked lists تربط nodesها فقط بالقيمة التالية. يسمح هذا النهج ذو الـ double pointer للـ doubly linked lists بأداء أفضل مع بعض الـ methods مقارنة بالـ singly linked lists، ولكن بتكلفة استهلاك المزيد من الذاكرة (مع الـ doubly linked lists نحتاج إلى تخزين two pointers بدلاً من واحد).
قد يبدو تطبيق كامل لـ doubly linked list هكذا:
// We create a class for each node within the list
class Node {
  // Each node has three properties, its value, a pointer that indicates the node that follows and a pointer that indicates the previous node
  constructor(val) {
    this.val = val;
    this.next = null;
    this.prev = null;
  }
}

// We create a class for the list
class DoublyLinkedList {
  // The list has three properties, the head, the tail and the list size
  constructor() {
    this.head = null
    this.tail = null
    this.length = 0
  }

  // The push method takes a value as parameter and assigns it as the tail of the list
  push(val) {
    const newNode = new Node(val)
    if (this.length === 0) {
      this.head = newNode
      this.tail = newNode
    } else {
      this.tail.next = newNode
      newNode.prev = this.tail
      this.tail = newNode
    }
    this.length++
    return this
  }

  // The pop method removes the tail of the list
  pop() {
    if (!this.head) return undefined
    const poppedNode = this.tail
    if (this.length === 1) {
      this.head = null
      this.tail = null
    } else {
      this.tail = poppedNode.prev
      this.tail.next = null
      poppedNode.prev = null
    }
    this.length--
    return poppedNode
  }

  // The shift method removes the head of the list
  shift() {
    if (this.length === 0) return undefined
    const oldHead = this.head
    if (this.length === 1) {
      this.head = null
      this.tail = null
    } else {
      this.head = oldHead.next
      this.head.prev = null
      oldHead.next = null
    }
    this.length--
    return oldHead
  }

  // The unshift method takes a value as parameter and assigns it as the head of the list
  unshift(val) {
    const newNode = new Node(val)
    if (this.length === 0) {
      this.head = newNode
      this.tail = newNode
    } else {
      this.head.prev = newNode
      newNode.next = this.head
      this.head = newNode
    }
    this.length++
    return this
  }

  // The get method takes an index number as parameter and returns the value of the node at that index
  get(index) {
    if (index < 0 || index >= this.length) return null
    let count, current
    if (index <= this.length / 2) {
      count = 0
      current = this.head
      while (count !== index) {
        current = current.next
        count++
      }
    } else {
      count = this.length - 1
      current = this.tail
      while (count !== index) {
        current = current.prev
        count--
      }
    }
    return current
  }

  // The set method takes an index number and a value as parameters, and modifies the node value at the given index in the list
  set(index, val) {
    var foundNode = this.get(index)
    if (foundNode != null) {
      foundNode.val = val
      return true
    }
    return false
  }

  // The insert method takes an index number and a value as parameters, and inserts the value at the given index in the list
  insert(index, val) {
    if (index < 0 || index > this.length) return false
    if (index === 0) return !!this.unshift(val)
    if (index === this.length) return !!this.push(val)

    var newNode = new Node(val)
    var beforeNode = this.get(index - 1)
    var afterNode = beforeNode.next
    beforeNode.next = newNode, newNode.prev = beforeNode
    newNode.next = afterNode, afterNode.prev = newNode
    this.length++
    return true
  }
}
تعقيد Big O لـ methods الـ Doubly linked lists هو كالتالي:
- Insertion - O(1)
- Removal - O(1)
- Search - O(n)
- Access - O(n)
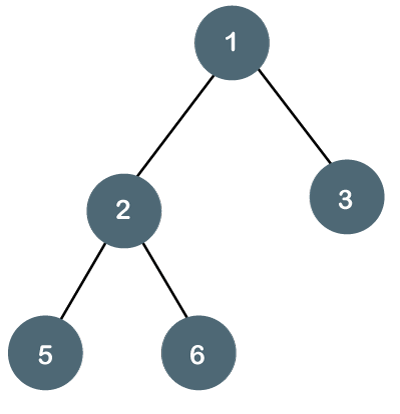
Trees
الـ Trees هي هياكل بيانات تربط الـ nodes في علاقة parent/child، بمعنى أن هناك nodes تعتمد على nodes أخرى أو تنبثق منها.

شجرة
تتكون الـ Trees من root node (الـ node الأولى في الشجرة)، وجميع الـ nodes التي تنبثق من هذا الـ root تسمى children. الـ nodes في أسفل الشجرة، والتي ليس لها "أحفاد"، تسمى leaf nodes. ويتم تحديد ارتفاع الشجرة بعدد اتصالات الـ parent/child التي تحتويها.
على عكس الـ linked lists أو الـ Arrays، فإن الـ Trees غير خطية (non-linear)، بمعنى أنه عند تكرار الشجرة، يمكن لتدفق البرنامج أن يتبع اتجاهات مختلفة داخل هيكلة البيانات وبالتالي يصل إلى قيم مختلفة. بينما في الـ linked lists أو الـ Arrays، يمكن للبرنامج فقط تكرار هيكلة البيانات من أحد طرفيها إلى الآخر، متبعاً دائماً نفس المسار.
من المتطلبات الهامة لتكوين الشجرة أن الاتصال الصالح الوحيد بين الـ nodes هو من parent إلى child. الاتصال بين الأشقاء أو من child إلى parent غير مسموح به في الـ Trees (هذه الأنواع من الاتصالات تشكل الـ Graphs، وهي نوع مختلف من هياكل البيانات). متطلب آخر مهم هو أن الـ Trees يجب أن تحتوي على root واحد فقط.
بعض الأمثلة على استخدام الـ Tree في البرمجة هي:
- نموذج DOM.
- تحليل المواقف في الذكاء الاصطناعي.
- مجلدات الملفات في أنظمة التشغيل.
هناك العديد من الأنواع المختلفة من الـ Trees. في كل نوع من أنواع الـ Tree، قد يتم تنظيم القيم باتباع أنماط مختلفة تجعل هيكلة البيانات هذه أكثر ملاءمة للاستخدام عند مواجهة أنواع مختلفة من المشاكل. الأنواع الأكثر شيوعاً من الـ Trees هي الـ binary trees والـ heaps.
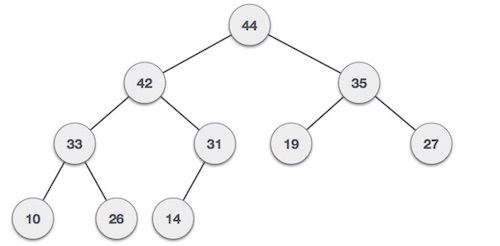
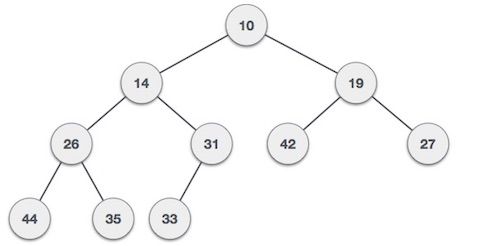
Binary trees
الـ Binary trees هي نوع من الـ Tree حيث تحتوي كل node على طفلين كحد أقصى.
شجرة ثنائية
أحد المواقف الرئيسية التي تكون فيها الـ binary trees مفيدة حقاً هو البحث. وللبحث، يتم استخدام نوع معين من الـ binary tree، يسمى binary search trees (BSTs). الـ BSTs تشبه الـ binary trees تماماً ولكن المعلومات بداخلها مرتبة بطريقة تجعلها هيكلة بيانات مناسبة للبحث. في الـ BST، يتم ترتيب القيم بحيث يجب أن تكون قيمة كل node تنزل إلى الجانب الأيسر من parentها أقل من parentها، ويجب أن تكون قيمة كل node تنزل إلى الجانب الأيمن من parentها أكبر من parentها.

شجرة بحث ثنائية
هذا الترتيب في قيمها يجعل هيكلة البيانات هذه رائعة للبحث، حيث يمكننا في كل مستوى من الشجرة تحديد ما إذا كانت القيمة التي نبحث عنها أكبر أو أصغر من الـ parent node، ومن هذه المقارنة يمكننا تدريجياً التخلص من حوالي نصف البيانات حتى نصل إلى قيمتنا.
عند إدراج أو حذف قيم، سيتبع الـ algorithm الخطوات التالية:
- التحقق مما إذا كان هناك
root node. - إذا كان هناك، تحقق مما إذا كانت القيمة المراد إضافتها/حذفها أكبر أو أصغر من الـ
node. - إذا كانت أصغر، تحقق مما إذا كانت هناك
nodeإلى اليسار وكرر العملية السابقة. إذا لم يكن هناك، أضف/أزل الـnodeفي هذا الموضع. - إذا كانت أكبر، تحقق مما إذا كانت هناك
nodeإلى اليمين وكرر العملية السابقة. إذا لم يكن هناك، أضف/أزل الـnodeفي هذا الموضع.
البحث في الـ BSTs مشابه جداً، فقط بدلاً من إضافة/حذف قيم، نتحقق من الـ nodes للمساواة مع القيمة التي نبحث عنها. تعقيد Big O لهذه العمليات هو لوغاريتمي (log(n)). ولكن من المهم إدراك أنه لتحقيق هذا التعقيد، يجب أن تكون الشجرة ذات بنية متوازنة بحيث يمكن "التخلص" من حوالي نصف البيانات في كل خطوة بحث. إذا تم تخزين المزيد من القيم إلى جانب واحد أو آخر من الشجرة، تتأثر كفاءة هيكلة البيانات.
قد يبدو تطبيق الـ BST هكذا:
// We create a class for each node within the tree
class Node {
  // Each node has three properties, its value, a pointer that indicates the node to its left and a pointer that indicates the node to its right
  constructor(value) {
    this.value = value
    this.left = null
    this.right = null
  }
}

// We create a class for the BST
class BinarySearchTree {
  // The tree has only one property which is its root node
  constructor() {
    this.root = null
  }

  // The insert method takes a value as parameter and inserts the value in its corresponding place within the tree
  insert(value) {
    const newNode = new Node(value)
    if (this.root === null) {
      this.root = newNode
      return this
    }
    let current = this.root
    while (true) {
      if (value === current.value) return undefined
      if (value < current.value) {
        if (current.left === null) {
          current.left = newNode
          return this
        }
        current = current.left
      } else {
        if (current.right === null) {
          current.right = newNode
          return this
        }
        current = current.right
      }
    }
  }

  // The find method takes a value as parameter and iterates through the tree looking for that value
  // If the value is found, it returns the corresponding node and if it's not, it returns undefined
  find(value) {
    if (this.root === null) return false
    let current = this.root, found = false
    while (current && !found) {
      if (value < current.value) {
        current = current.left
      } else if (value > current.value) {
        current = current.right
      } else {
        found = true
      }
    }
    if (!found) return undefined
    return current
  }

  // The contains method takes a value as parameter and returns true if the value is found within the tree
  contains(value) {
    if (this.root === null) return false
    let current = this.root, found = false
    while (current && !found) {
      if (value < current.value) {
        current = current.left
      } else if (value > current.value) {
        current = current.right
      } else {
        return true
      }
    }
    return false
  }
}
Heaps
الـ Heaps هي نوع آخر من الـ Trees لها بعض القواعد الخاصة. هناك نوعان رئيسيان من الـ Heaps: MaxHeaps و MinHeaps. في الـ MaxHeaps، تكون الـ parent nodes دائماً أكبر من childrenها، وفي الـ MinHeaps، تكون الـ parent nodes دائماً أصغر من childrenها.
Max Heap
Min Heap
في هيكلة البيانات هذه، لا توجد ضمانات بين الأشقاء (siblings)، مما يعني أن الـ nodes في نفس "المستوى" لا تتبع أي قاعدة بخلاف كونها أعلى/أقل من parentها. أيضاً، الـ Heaps مدمجة قدر الإمكان، مما يعني أن كل مستوى يحتوي على جميع الـ nodes التي يمكن أن يحتويها بدون مسافات فارغة، ويتم وضع الـ children الجديدة في المساحات اليسرى من الشجرة أولاً.
تُستخدم الـ Heaps، وخاصة الـ binary heaps، بشكل متكرر لتطبيق priority queues، والتي تُستخدم بدورها بشكل متكرر في الـ algorithms المعروفة مثل Dijkstra's path-finding algorithm. الـ Priority queues هي نوع من هياكل البيانات حيث يكون لكل عنصر أولوية مرتبطة به، ويتم تقديم العناصر ذات الأولوية الأعلى أولاً.
Graphs
الـ Graphs هي هيكلة بيانات تتكون من مجموعة من الـ nodes وبعض الاتصالات بين تلك الـ nodes. على عكس الـ Trees، لا تحتوي الـ Graphs على root و leaf nodes، ولا على "head" أو "tail". تتصل الـ nodes المختلفة ببعضها البعض ولا يوجد اتصال parent-child ضمني بينها.
رسم بياني (Graph)
الـ Graphs هي هياكل بيانات مفيدة غالباً لـ:
- الشبكات الاجتماعية (Social networks).
- تحديد المواقع الجغرافية (Geolocalization).
- أنظمة التوصية (Recommendation systems).
يمكن تصنيف الـ Graphs إلى أنواع مختلفة وفقاً لخصائص الاتصالات بين الـ nodes:
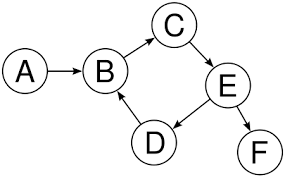
Undirected and directed graphs
نقول إن الـ Graph غير موجه (undirected) إذا لم يكن هناك اتجاه ضمني في الاتصالات بين الـ nodes. إذا أخذنا الصورة المثال التالية، يمكنك أن ترى أنه لا يوجد اتجاه في الاتصال بين الـ node 2 والـ node 3. الاتصال يسير في كلا الاتجاهين، مما يعني أنه يمكنك اجتياز هيكلة البيانات من الـ node 2 إلى الـ node 3، ومن الـ node 3 إلى الـ node 2. الـ Undirected يعني أن الاتصالات بين الـ nodes يمكن استخدامها في كلا الاتجاهين.

رسم بياني غير موجه
وكما خمنت، الـ directed graphs هي العكس تماماً. دعنا نعيد استخدام الصورة المثال السابقة، ونرى أن هنا يوجد اتجاه ضمني في الاتصالات بين الـ nodes. في هذا الـ Graph بالذات، يمكنك الانتقال من الـ node A إلى الـ node B، ولكن لا يمكنك الانتقال من الـ node B إلى الـ node A.
رسم بياني موجه
Weighted and unweighted graphs
نقول إن الـ Graph مرجح (weighted) إذا كانت الاتصالات بين الـ nodes لها وزن مخصص. في هذه الحالة، يعني الوزن ببساطة قيمة مخصصة لاتصال معين. إنها معلومات حول الاتصال نفسه، وليست حول الـ nodes. باتباع هذا المثال، يمكننا أن نرى أن الاتصال بين الـ nodes 0 و 4 له وزن 7. والاتصال بين الـ nodes 3 و 1 له وزن 4.

رسم بياني مرجح
لفهم استخدام الـ weighted graphs، تخيل أنك تريد تمثيل خريطة بها العديد من المواقع المختلفة، وتقديم معلومات للمستخدم حول المدة التي قد يستغرقها للانتقال من مكان إلى آخر. سيكون الـ weighted graph مثالياً لذلك، حيث يمكنك استخدام كل node لحفظ معلومات حول الموقع، ويمكن أن تمثل الاتصالات الطرق المتاحة بين كل مكان، وستمثل الأوزان المسافة المادية من مكان إلى آخر.
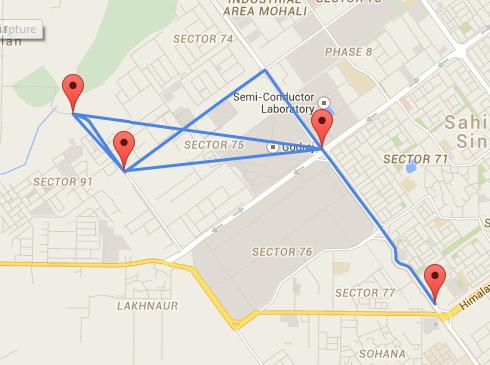
تُستخدم الـ Weighted graphs بكثرة في أنظمة تحديد المواقع الجغرافية
وكما خمنت مرة أخرى، الـ unweighted graphs هي تلك التي لا تحتوي فيها الاتصالات بين الـ nodes على أوزان مخصصة. لذا لا توجد معلومات خاصة حول الاتصالات بين الـ nodes، فقط حول الـ nodes نفسها.
كيفية تمثيل Graphs
عند كتابة كود الـ Graphs، هناك طريقتان رئيسيتان يمكننا استخدامهما: adjacency matrix و adjacency list. دعنا نشرح كيف يعمل كلاهما ونرى إيجابيات وسلبيات كل منهما.
الـ adjacency matrix هي هيكل ثنائي الأبعاد يمثل الـ nodes في الـ Graph الخاص بنا والاتصالات بينها. إذا استخدمنا هذا المثال...
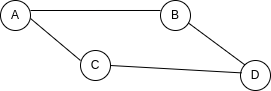
ستبدو الـ adjacency matrix الخاصة بنا هكذا:
  A B C D
A 0 1 1 0
B 1 0 0 1
C 1 0 0 1
D 0 1 1 0
يمكنك أن ترى أن الـ matrix تشبه الجدول، حيث تمثل الأعمدة والصفوف الـ nodes في الـ Graph الخاص بنا، وتمثل قيمة الخلايا الاتصالات بين الـ nodes. إذا كانت الخلية 1، فهناك اتصال بين الصف والعمود، وإذا كانت 0، فلا يوجد. يمكن تكرار الجدول بسهولة باستخدام Array ثنائية الأبعاد:
[
  [0, 1, 1, 0],
  [1, 0, 0, 1],
  [1, 0, 0, 1],
  [0, 1, 1, 0]
]
من ناحية أخرى، يمكن اعتبار الـ adjacency list هيكلاً من أزواج المفتاح-القيمة حيث تمثل المفاتيح كل node في الـ Graph الخاص بنا، والقيم هي الاتصالات التي يمتلكها هذا الـ node بالذات. باستخدام نفس الـ Graph المثال، يمكن تمثيل الـ adjacency list الخاصة بنا بهذا الـ Object:
{
  A: ["B", "C"],
  B: ["A", "D"],
  C: ["A", "D"],
  D: ["B", "C"],
}
يمكنك أن ترى أنه لكل node لدينا مفتاح، ونقوم بتخزين جميع اتصالات الـ node داخل Array. فما الفرق بين الـ adjacency matrices والـ lists؟ حسناً، تميل الـ lists إلى أن تكون أكثر كفاءة عندما يتعلق الأمر بإضافة أو إزالة الـ nodes، بينما تكون الـ matrices أكثر كفاءة عند الاستعلام عن اتصالات محددة بين الـ nodes.
لنرَ هذا، تخيل أننا أردنا إضافة node جديدة إلى الـ Graph الخاص بنا:

لتمثيل هذا في matrix، سنحتاج إلى إضافة عمود جديد بالكامل وصف جديد بالكامل:
  A B C D E
A 0 1 1 0 0
B 1 0 0 1 1
C 1 0 0 1 0
D 0 1 1 0 0
E 0 1 0 0 0
بينما للقيام بنفس الشيء في list، يكفي إضافة قيمة إلى اتصالات B وزوج مفتاح-قيمة لتمثيل E:
{
  A: ["B", "C"],
  B: ["A", "D", "E"],
  C: ["A", "D"],
  D: ["B", "C"],
  E: ["B"],
}
الآن تخيل أننا نريد التحقق مما إذا كان هناك اتصال موجود بين الـ node B و E. التحقق من ذلك في matrix سهل للغاية، حيث نعرف بالضبط الموضع في الـ matrix الذي يمثل هذا الاتصال.
  A B C D E
A 0 1 1 0 0
B 1 0 0 1 1
C 1 0 0 1 0
D 0 1 1 0 0
E 0 1 0 0 0
ولكن في list، ليس لدينا هذه المعلومات، وسنحتاج إلى تكرار كل الـ Array التي تمثل اتصالات B ونرى ما بداخلها. لذا يمكنك أن ترى أن هناك إيجابيات وسلبيات لكل نهج.
قد يبدو تطبيق كامل لـ Graph باستخدام adjacency list هكذا. لتبسيط الأمور، سنمثل undirected unweighted graph.
// We create a class for the graph
class Graph {
  // The graph has only one property which is the adjacency list
  constructor() {
    this.adjacencyList = {}
  }

  // The addNode method takes a node value as parameter and adds it as a key to the adjacencyList if it wasn't previously present
  addNode(node) {
    if (!this.adjacencyList[node])
      this.adjacencyList[node] = []
  }

  // The addConnection takes two nodes as parameters, and it adds each node to the other's array of connections.
  addConnection(node1, node2) {
    this.adjacencyList[node1].push(node2)
    this.adjacencyList[node2].push(node1)
  }

  // The removeConnection takes two nodes as parameters, and it removes each node from the other's array of connections.
  removeConnection(node1, node2) {
    this.adjacencyList[node1] = this.adjacencyList[node1].filter(
      v => v !== node2)
    this.adjacencyList[node2] = this.adjacencyList[node2].filter(
      v => v !== node1)
  }

  // The removeNode method takes a node value as parameter. It removes all connections to that node present in the graph and then deletes the node key from the adj list.
  removeNode(node) {
    while (this.adjacencyList[node].length) {
      const adjacentNode = this.adjacencyList[node].pop()
      this.removeConnection(node, adjacentNode)
    }
    delete this.adjacencyList[node]
  }
}

const Argentina = new Graph()
Argentina.addNode("Buenos Aires")
Argentina.addNode("Santa fe")
Argentina.addNode("Córdoba")
Argentina.addNode("Mendoza")
Argentina.addConnection("Buenos Aires", "Córdoba")
Argentina.addConnection("Buenos Aires", "Mendoza")
Argentina.addConnection("Santa fe", "Córdoba")
console.log(Argentina)
// Graph {
// adjacencyList: {
// 'Buenos Aires': [ 'Córdoba', 'Mendoza' ],
// 'Santa fe': [ 'Córdoba' ],
// 'Córdoba': [ 'Buenos Aires', 'Santa fe' ],
// Mendoza: [ 'Buenos Aires' ]
// }
// }
خلاصة
هذا كل شيء أيها الأصدقاء. في هذا المقال، قدمنا هياكل البيانات الرئيسية المستخدمة في علوم الحاسوب وتطوير البرمجيات. هذه الهياكل هي أساس معظم البرامج التي نستخدمها في حياتنا اليومية، لذا فإن معرفتها قيمة للغاية. على الرغم من أن هذا الموضوع قد يبدو مجرداً ومخيفاً بعض الشيء في البداية، إلا أننا نعتقد أنه يمكننا فهمه بشكل أفضل بمجرد التفكير في هياكل البيانات كطرق ننظم بها البيانات لتحقيق مهام معينة بشكل أفضل.
كالعادة، نأمل أن تكونوا قد استمتعتم بالمقال وتعلمتم شيئاً جديداً.
